


The days of trundling hoops, hopscotch and painted wooden rocking horses are long since past. The latest trend in toys? Biofeedback. Electroencephalography. A decade into the 21st century, the toy market is awash in products that incorporate functional neural sensors.
One such contraption is Uncle Milton's Star Wars Force Trainer (~$80), a toy which challenges players to levitate a ping-pong ball.

Another such toy is Mattel's Mindflex (~$75).

Both products license their EEG tech from NeuroSky, a company that also sells its own research-grade brain-computer interface, the MindSet ($200). What the hacker community has discovered, however, is that, with a little bit of tweaking, the $75-dollar Mindflex can be made to behave a lot like its more expensive counterpart.
Complete instructions follow below (via Frontier Nerds).
You Will Need:
- 1 x Mindflex
- 3 x AAA batteries for the headset
- 1 x Arduino (any variety), with USB cable
- 2 x 12" lengths of solid core hookup wire (around #22 or #24 gauge is best).
- A PC or Mac to monitor the serial data
- Arduino Brain Library (download here)
- Optional: Processing Brain Visualizer (download here, it will help to have Processing as well)
- Optional (required for the visualizer): controlP5 Processing GUI Library (download here)
Step 1 Disassemble the Mind Flex headset.
Grab a screwdriver and crack open the left pod of the Mind Flex headset. (The right pod holds the batteries.)
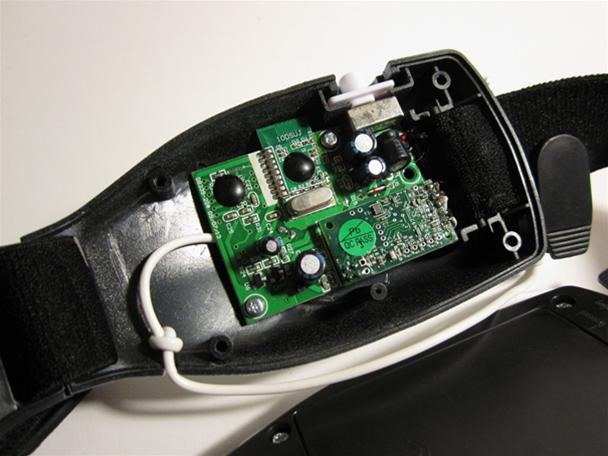
Step 2 Solder a length of wire to the "T" pin.
The NeuroSky Board is the small daughterboard towards the bottom of the headset. If you look closely, you should see conveniently labeled T and R pins — these are the pins the EEG board uses to communicate serially to the microcontroller on the main board, and they're the pins we'll use to eavesdrop on the brain data. Solder a length of wire (carefully) to the "T" pin. Thin wire is fine, we used #24 gauge. Be careful not to short the neighboring pins.
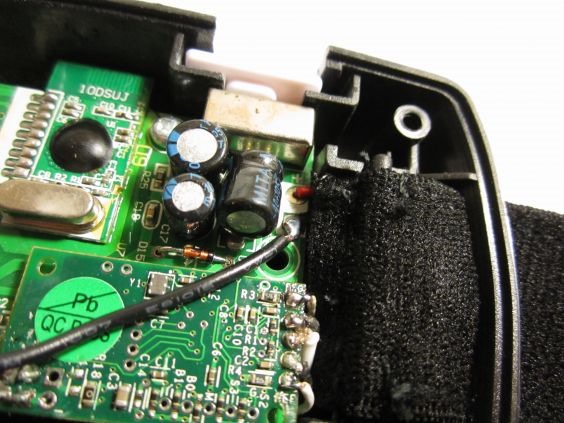
Step 3 Ground it.
Your Arduino will want to share ground with the Mind Flex circuit. Solder another length of wire to ground — any grounding point will do, but using the large solder pad where the battery's ground connection arrives at the board makes the job easier. A note on power: We've found the Mind Flex to be inordinately sensitive to power… our initial hope was to power the NeuroSky board from the Arduino's 3.3v supply, but this proved unreliable. For now we're sticking with the factory configuration and powering the Arduino and Mind Flex independently.
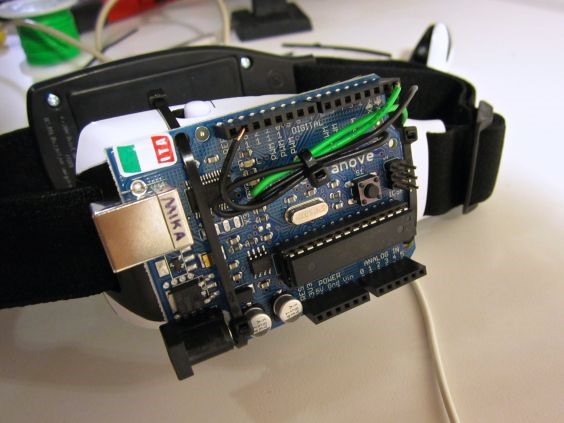
Step 4 Route the wires.
We used a dab of hot glue to act as strain relief for the new wires, and drilled a hole in the case for the two wires to poke through after the case was closed. This step is optional.
Step 5 Hook up the Arduino.
The wire from the Mind Flex's "T" pin goes into the Arduino's RX pin. The ground goes… to ground. You may wish to secure the Arduino to the side of the Mind Flex as a matter of convenience. (We used zip ties.
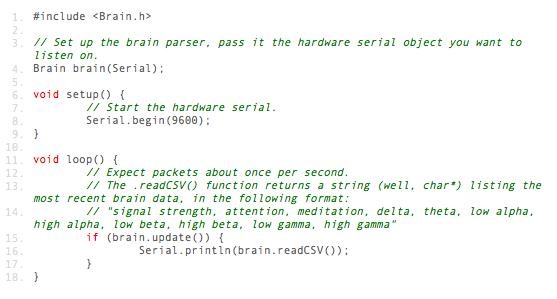
Step 6 Load up the Arduino.
Download and install the Arduino Brain Library — it's available here. Open the BrainSerialOut example and upload it to your board. (You may need to disconnect the RX pin during the upload.) The example code looks like this:
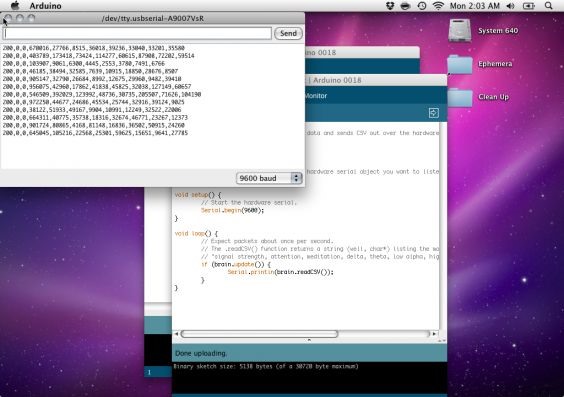
Step 7 Test.
Turn on the Mind Flex, make sure the Arduino is plugged into your computer, and then open up the Serial Monitor. If all went well, you should see the following:
Here's how the CSV breaks down: "signal strength, attention, meditation, delta, theta, low alpha, high alpha, low beta, high beta, low gamma, high gamma"
(More on what these values are supposed to mean later in the article. Also, note that if you are hacking a Force Trainer instead of a Mind Flex, you will only see the first three values — signal strength, attention, and meditation.)
If you put the unit on your head, you should see the "signal strength" value drop to 0 (confusingly, this means the connection is good), and the rest of the numbers start to fluctuate.
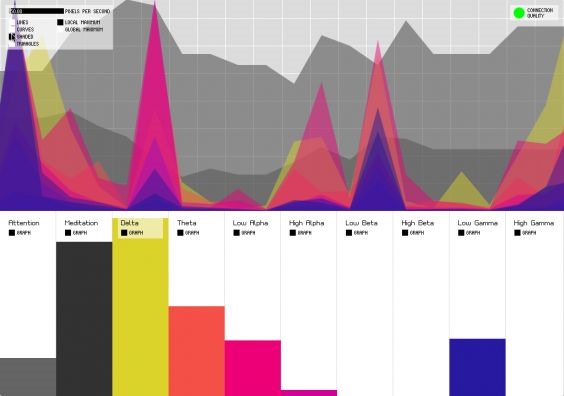
Step 8 Visualize.
As exciting as the serial monitor is, you might think, "Surely there's a more intuitive way to visualize this data!" You're in luck: I've written a quick, open-source visualizer in Processing which graphs your brain activity over time (download). It's designed to work with the BrainSerialOut Arduino code you've already loaded.
Download the code, and then open up the brain_grapher.pde file in Processing. With the Mind Flex plugged in via USB and powered on, go ahead and run the Processing sketch. (Just make sure the Arduino IDE's serial monitor is closed, otherwise Processing won't be able to read from the Mind Flex.) You may need to change the index of the serial list array in the brain_grapher.pde file, in case your Arduino is not the first serial object on your machine:
serial = new Serial(this, Serial.list()[0], 9600);
You should end up with a screen like this:
Read more at Frontier Nerds: An ITP Blog.
Just updated your iPhone? You'll find new emoji, enhanced security, podcast transcripts, Apple Cash virtual numbers, and other useful features. There are even new additions hidden within Safari. Find out what's new and changed on your iPhone with the iOS 17.4 update.


1 Comment
Im really blown away to know that they were using such tech for toys. I really want to buy one now.
Share Your Thoughts